odul
ww-robinie
english translation below.
Von den osVAC neo-SChlauchverbindern gibt es auch eine geteilte Version, z.B,. hier: https://www.thingiverse.com/thing:6152904
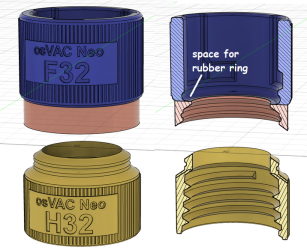
Und so werden sie montiert:
Man schneidet ein Stück Filament zurecht, das 5-10mm kürzer ist als der gezeigte Umfang. Hier empfiehlt sich PETG, da es elastischer ist.
Das vordere Ende wird recht schräg abgeschnitten, das hintere möglichst gerade.
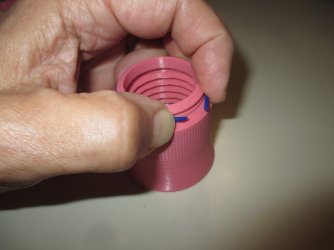
Auf der Rückseite des Oberteils ist ein kleines Loch durch das schiebt man das Filament mit dem spitzen Ende voran versuchsweise ein.
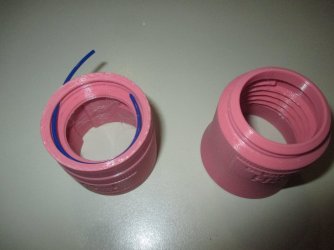
Dann fügt man die Hälften zusammen und führt das Filament ein. Klemmt es etwas, hilft es während des Einschiebens die Hälften gegeneinander hin- und her zudrehen.
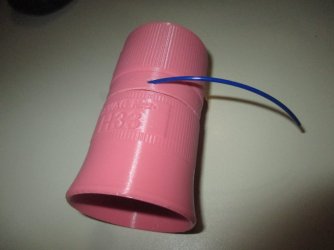
Guckt nur noch ein Stummel raus, setzt man den Verbinder an einer scharfen Kante an und drückt den Rest ein.
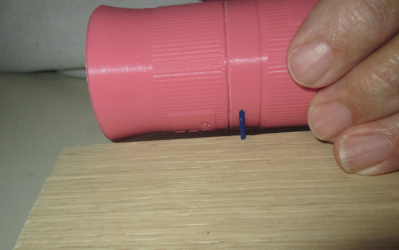
Abschließend nimmt man ein weiteres Stück Filament, einen dünnen Inbus oder Nagel und schiebt das (hier blaue) Filamentstück so tief wie möglich in das Loch ein.
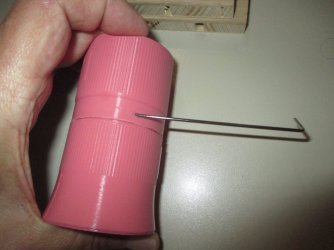
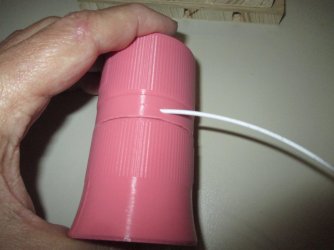
Das wars. Die Häften sind dauerhaft miteinander drehbar verbunden. Nach den bisherigen Erfahrungen ist es nicht notwendig das Loch zu verschließen. Das Filamentstück kommt nicht wieder raus.
Nachtrag:
Bevor man die Hälften zusammenfügt glätten man die Drehflächen, falls notwendig, mit etwas Schmirgelpapier.
There is also a split version of the osVAC neo hose connectors, e.g. here: https://www.thingiverse.com/thing:6152904
There is a small hole on the back of the upper part through which the filament is inserted for testing with the pointed end first.
Then join the halfes together and insert the filament. If it jams a little, it helps to turn the halfes back and forth while inserting the filament.
If only a stub is sticking out, place the connector on a sharp edge and push the rest in.
Finally, take another piece of filament, a thin Allen key or nail and push the (here blue) piece of filament as deep as possible into the hole.
That's it. The halfes are permanently and rotatably connected to each other. Based on previous experience, it is not necessary to seal the hole. The piece of filament does not come out again.
Addendum:
Before joining the halfes together, smooth the rotating surfaces with some sandpaper if necessary.
Von den osVAC neo-SChlauchverbindern gibt es auch eine geteilte Version, z.B,. hier: https://www.thingiverse.com/thing:6152904

Und so werden sie montiert:
Man schneidet ein Stück Filament zurecht, das 5-10mm kürzer ist als der gezeigte Umfang. Hier empfiehlt sich PETG, da es elastischer ist.
Das vordere Ende wird recht schräg abgeschnitten, das hintere möglichst gerade.

Auf der Rückseite des Oberteils ist ein kleines Loch durch das schiebt man das Filament mit dem spitzen Ende voran versuchsweise ein.

Dann fügt man die Hälften zusammen und führt das Filament ein. Klemmt es etwas, hilft es während des Einschiebens die Hälften gegeneinander hin- und her zudrehen.

Guckt nur noch ein Stummel raus, setzt man den Verbinder an einer scharfen Kante an und drückt den Rest ein.

Abschließend nimmt man ein weiteres Stück Filament, einen dünnen Inbus oder Nagel und schiebt das (hier blaue) Filamentstück so tief wie möglich in das Loch ein.


Das wars. Die Häften sind dauerhaft miteinander drehbar verbunden. Nach den bisherigen Erfahrungen ist es nicht notwendig das Loch zu verschließen. Das Filamentstück kommt nicht wieder raus.
Nachtrag:
Bevor man die Hälften zusammenfügt glätten man die Drehflächen, falls notwendig, mit etwas Schmirgelpapier.
There is also a split version of the osVAC neo hose connectors, e.g. here: https://www.thingiverse.com/thing:6152904
There is a small hole on the back of the upper part through which the filament is inserted for testing with the pointed end first.
Then join the halfes together and insert the filament. If it jams a little, it helps to turn the halfes back and forth while inserting the filament.
If only a stub is sticking out, place the connector on a sharp edge and push the rest in.
Finally, take another piece of filament, a thin Allen key or nail and push the (here blue) piece of filament as deep as possible into the hole.
That's it. The halfes are permanently and rotatably connected to each other. Based on previous experience, it is not necessary to seal the hole. The piece of filament does not come out again.
Addendum:
Before joining the halfes together, smooth the rotating surfaces with some sandpaper if necessary.

